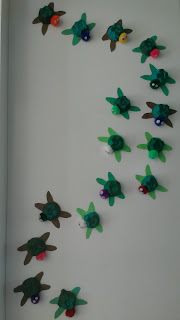
I saw this idea on Pinterest and could not wait to make some little sea turtles for our craft wall! These were so easy to make and the end result is so cute!
I started by cutting apart an empty egg carton and evening out the edges so there were no pieces sticking out. I would recommend doing this part before letting kids help you because it's a little tedious to cut apart each section of the egg carton.
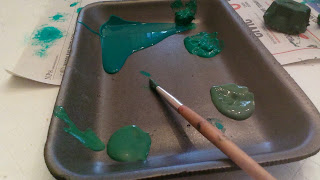
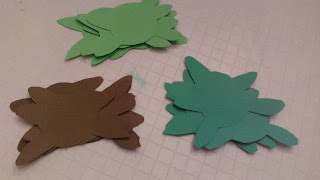
I then gathered some different shades of green paint and painted all of the pieces of egg carton green. Once they were all painted, I left them out to dry on some scrap newspaper. While the egg cartons were drying, I gathered some construction paper (lime green, dark green and brown), some pom poms, some googly eyes and a hot glue gun to use while making the turtles.
I made some little templates for the turtles' bodies and cut out 6 dark green bodies, 6 lime green bodies and 6 brown bodies, then set them aside until I was ready to glue them onto the egg cartons.
I set out the 18 pom poms I was going to use for the turtle's heads. We have a big pack of pom poms of all different sizes, but we chose to use the medium sized ones because they seemed to look the best when held up to the turtles' shells. My little helper wanted to use as many colors as possible for the heads but you could easily only use green/yellow/white/brown pom poms, if you want you turtles to look more realistic. We also have a sac of different sized and colored googly eyes, but we opted to use the smallest ones and the medium sized ones for our turtles. I hot glued 2 googly eyes onto each pom pom.
Once my painted cartons were dry, I hot glued each of them onto a construction paper turtle body, then glued a pom pom head onto the front of the cartons.
We used sticky tack to put these up on our wall, and we organized them into a little line just like real newly hatched sea turtles that make their way from their nests to the ocean. They are so cute and there is now talk of crafting them a little ocean wave to walk towards.
Happy sea turtle crafting!
Kenzie
Tuesday, May 31, 2016
Monday, May 30, 2016
Mango Strawberry Smoothie
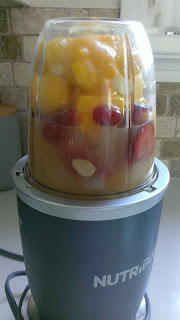
I start by gathering my ingredients: Water, Orange Juice, Almond slices, frozen strawberries, frozen mangoes and my nutribullet.
I add about 1/2 cup of frozen mangoes and 1/4 of frozen strawberries to my blender container. You could easily replace the mangoes and strawberries with any other frozen fruits you like.
I sprinkle a handful of sliced almonds on top of my frozen fruit. I do this for a little extra calcium and protein but you could easily leave out the almonds or use another nut.
Once all my ingredients are in the container, I blend them with the Nutribullet for about 3 minutes. If there are any left over chunks, I blend it a little longer.
I'm drinking one of these as I write and it is fruity, summery perfection!
Mango Strawberry Smoothie
Ingredients:
1/2 cup frozen mangoes
1/4 cup frozen strawberries
handful of sliced almonds
orange juice
water
Directions:
1. Pour frozen mango, strawberries, almonds, orange juice and water in Nutribullet container.
2. Blend for 3 minutes (more if necessary)
Enjoy!
Kenzie
Friday, May 27, 2016
Friday Favorites
The weekend is near! I'm linking up with Andrea from Momfessionals, Narci from Grace and Love and Erika from A Little Bit of Everything to share my favorites from this week!
ONE
Chocolate covered strawberries were the most perfect treat this week! They are easy and delicious! Find how I make chocolate covered strawberries here.
TWO
I saw "The Age of Adaline" this week and it was so good! I was in a complete state of disbelief while watching this movie because despite the fact that the story line is fiction, it feels so real! I didn't really understand what was happening in the story until about 30 minutes in, but I urge you to power through because this ended up being a beautiful movie!
THREE
Speaking of amazing movies... "About Time" is another one of my favorites! While I was watching "The Age of Adaline" I was reminded of "About Time" because both movies deal with time and both serve as a pertinent reminder to live with intention and integrity. I highly recommend both of these movies!
FOUR
FIVE
I shared what I've been listening to lately on Tuesday and that playlist is definitely a favorite! It's on repeat every day! Find my favorite songs here.
Happy weekend!
Kenzie
Thursday, May 26, 2016
Crock-pot Spaghetti Bolognese
I found this fun recipe a couple of weeks ago on A Little Spice Jar's blog and I could not wait to make it! I love spaghetti bolognese and the end result did not disappoint! I should mention that this recipe makes a TON of sauce but you could easily freeze what you don't use and serve as a meal later. I think this recipe made enough sauce to serve about 16 people, so you could half the ingredients to cater to a smaller number of people.
I started by putting 1 onion, 2 stalks of celery and 2 carrots into the food processor until they were coarsely grated. Once they were grated, I put 2 tablespoons of olive oil into a pot on the stove at medium heat and added my vegetables.
I let the vegetables mixture cook for 10 minutes then added 4 cloves of garlic and 1/4 cup of tomato paste. I stirred in the garlic and tomato paste and let the mixture cook for 30-60 seconds.
I increased the heat to medium-high then added 2 1/2 pounds of ground beef, 1/2 teaspoon of salt, 1/2 teaspoon of pepper, 1 teaspoon of Italian seasoning and 1/4 teaspoon of red pepper flakes.
Once the ground beef was browned, I added 3 tablespoons of apple cider vinegar and let the mixture cook for 5 minutes.
Once the meat was done cooking, I removed it from the heat and added it to my crock-pot along with a 14oz can of diced tomatoes (drained), 2 28oz cans of San Marzano tomatoes (I pureed my San Marzano tomatoes in the food processor), 2 bay leaves, 2 Parmesan rinds and 1/4 cup of chopped parsley.
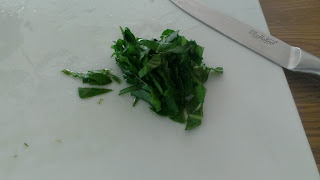
To chop my parsley, I put about a 1/4 cup into a mug then used my kitchen scissors to cut the parsley! This is a fun and easy trick I learned from my mom! Once all the ingredients were in my slow cooker, I let my sauce cook on low for 8 hours. After cooking on low for 8 hours, I added 3/4 cups of cream and forgot to take pictures! Oops! I guess it was just so delicious that I forgot to get the camera!
Spaghetti Bolognese:
Ingredients:
2 tablespoons olive oil
1 medium onion, coarsely grated
2 stalks on celery, coarsely grated
2 medium carrots, coarsely grated
4 cloves garlic, minced
1/4 cup tomato paste
2 1/2 pounds ground beef
1/2 teaspoon of salt
1/2 teaspoon pepper
1 teaspoon Italian seasoning
1/4 teaspoon red pepper flakes
3 tablespoons apple cider vinegar
2-28oz cans San Marzano tomatoes
14oz can diced tomatoes (drained)
2 bay leaves
2 Parmesan rinds
1/4 cup chopped parsley
3/4 cup cream
Directions:
1. Coarsely grate onion celery and carrot in a food processor.
2. Heat olive oil in a pot on medium heat. Add vegetable mixture and cook for 10 minutes.
3. Add minced garlic and tomato paste to the vegetable mixture and cook on medium heat for 30-60 seconds.
4. Increase heat to medium high, then add the ground beef, salt, pepper, Italian seasoning and red pepper flakes. Cook until the meat is browned, then add the apple cider vinegar and cook for about 5 minutes.
5. Remove the meat from the heat and pour it into the crock-pot along with drained diced tomatoes, purred San Marzano tomatoes, bay leaves, Parmesan rinds and parsley.
6. Let the sauce cook on low for 8 hours. Once the sauce is finished cooking, add the cream, stil until incorporated and serve over pasta!
Enjoy!
Kenzie
Wednesday, May 25, 2016
Party Games: The Best Game Ever
The name of this game really does not lie, it might just be the best game ever! :) To begin this game, split your party guests into 2 teams. It's important to have an even number of kids on each team. To better explain this game, I will use 2 made up teams: team red and team blue. Have your teams sit in separate areas of the room - maybe one team on each end of the room with the animator in the middle.
Here is a free printable that I've created for parties, note this sheet was created for a party with 10 guests (5 on each team). If you have more party guests, you will need to come up with a few more categories. The animator should explain that he/she will read out a category (like who has the longest hair) and each team sends up a representative who they think can win the category. It is important to mention that each player can only represent their team twice during the game so they must think strategically as they choose their representatives.
Depending on the age of the children, it can be helpful to have a helper with each team, to guide the kids in their decisions and ease any conflicts. Once team red and team blue have chosen a representative, the representatives will come to the middle, with the animator and complete the task or evaluate if they really are the best in that category. If team blue's player is the best at the given category, team blue is awarded a point and vice versa. The game continues like this until every player has represented their team twice and the team with the most points wins!
Recap:
1. Print out my free printable of categories. (NOTE: if your party has more than 10 guests you will need to come up with more categories. The number of categories = the number of party guests!)
2. Split your party guests into 2 teams.
3. Explain that you will read out a task/category and each team will have to send up a player that they think can best perform in that category, however every player can only represent their team twice throughout the game.
4. Once each team sends up a representative, evaluate which player really is the best in the category and award a point to the team of the winning player.
5. The team with the most points wins!
See you tomorrow!
Kenzie
Tuesday, May 24, 2016
Kenzie's Playlist: Spring 2016
One of my favorite things in the whole world is music! I constantly have music playing through my house, I think everything is more enjoyable when music is playing - long car rides, backyard parties, homework... A great playlist changes everything! Here is what I have been listening to this spring:
1. Roses by MacKenzie Bourg
2. They're in Love, Where Am I? by The Weepies
3. Just Like Fire by P!nk
4. Lost in Your Love by Michael Prins
5. Lovin' You Tonight by Andrew Allen
6. These Words by Natasha Bedingfield
7. Fire Away by Chris Stapleton
8. Choctaw County Affair by Carrie Underwood
9. Trouble by Jennifer Hudson & Iggy Azalea
10. Me Too by Meghan Trainor
This playlist reveals the wide array of music I listen to. Several of my friends have laughed when scrolling through my music because I have some Broadway, some rap, some country; when it comes to music, I really don't discriminate!
Happy Tuesday!
Kenzie
Monday, May 23, 2016
Chocolate Covered Strawberries
Chocolate covered strawberries are one of my favorite sweet treats! I made them last week and was reminded just how easy they are to put together! These are perfect to whip up for a fun dessert during the summer!
I started by gathering some strawberries, some wax paper and some milk chocolate chips.
I washed 6 strawberries (the amount of strawberries could easily be modified to cater to the number of people you'll have eating them). Once my strawberries were washed, I set them out to dry on a dish towel.
I melted 1/4 cup of milk chocolate chip cookies by microwaving them for 20 seconds, stirring and repeating until they were completely melted.
Once the chocolate was melted, I held the strawberries by their stems and dipped them in the chocolate. I used a spoon to make sure the strawberries were completely coated, then set the chocolate covered strawberries onto wax paper to set. I ended up finding some white chocolate chips stashed in my cupboard, so I melted some of those and coated some strawberries in white chocolate!
When all of my strawberries were coated in their base layer of chocolate, I used the opposite kind of chocolate to drizzle on top. Instead of drizzling additional chocolate, you could sprinkle some sprinkles, chopped nuts, coconut... on top of your chocolate covered strawberries. Once I was done decorating the strawberries, I slid the wax paper onto a cutting board and set the strawberries in the fridge for 30 minutes to let the chocolate solidify.
Chocolate Covered Strawberries
Ingredients:
Strawberries
Chocolate (milk/dark/white)
Wax paper
cutting board
Other desired toppings (sprinkles, chopped nuts, coconut...)
Directions:
1. Wash desired amount of strawberries and set to dry on dish towel.
2. Melt chocolate in the microwave for 20 second intervals, stirring in between. Careful not to let the chocolate burn.
3. Hold strawberries from stem and dip them into the chocolate, use a spoon as necessary to completely coat the strawberries in chocolate. Set chocolate covered strawberries on wax paper.
4. Decorate chocolate covered strawberries with desired toppings (drizzled chocolate, sprinkles, chopped nuts, coconut...).
5. Let chocolate covered strawberries solidify by placing them in the fridge for 30 minutes.
Enjoy!
Kenzie
Friday, May 20, 2016
Friday Favorites
Happy Friday! Today, I'm linking up with Andrea from Momfessionals, Narci from Grace and Love and Erika from A Little Bit of Everything to share my favorites from this week!
One
My TOMS wedges have been an absolute favorite lately! They pair so easily with leggings, jeans or a dress and they are so comfortable! I have them in Taupe Suede but they also sell in black. These definitely run true to size!
Two
Meghan Trainor's new album Thank you came out last Friday and it is so fun! I have had it on shuffle all week! My favorites are Watch Me Do, Me Too and Dance Like Yo Daddy!
Three
On Wednesday, I shared about my happy jar. My happy jar has been a long time favorite, I think it so important to keep reminders of what makes you smile! You can check how I use my happy jar here.
Four
Yesterday, I posted one of my favorite meals; Italian Sausage Tortellini. Even though it is spring, we have been having some chilly weather and this is a great recipe for a cool day! Find the recipe for that here!
Have a great weekend!
Kenzie
Thursday, May 19, 2016
Italian Sausage Tortellini
This is a recipe that I found about a year ago on kevinandamanda.com that I have made some little changes to. You can find the original recipe here. Here is my version of Italian Sausage Tortellini:
I start by heating a tablespoon of olive oil in a skillet. While the olive oil is heating, I chop up 1 medium onion.
Once the olive oil is hot, I add the onions to the skillet and let them cook for about 5 minutes, stirring occasionally.
While the onions are cooking, I take 6 Italian sausages out if the fridge and remove them from their casing.
Once the Italian sausages are out of their casing, I put them in the skillet to cook with the onions. As they are beginning to cook, I use a wooden spoon to break the sausages into small pieces (about the same size as the tortellini will be).
I cooked the Italian sausage and onion on medium heat until the sausage in browned and cooked through. It is quite easy to see as the sausage is cooking because you will be breaking the sausages into pieces.
If you have a large enough skillet, you could cook the entire recipe in the skillet. My skillet was a little too small and I was worried about it overflowing once I added my wet ingredients, so I switched my cooked Italian sausage and onion over to a pot and lowered the heat.
I left my Italian sausages and onions on low heat while I got out 3 cloves of garlic to crush into the pot.
Once my garlic was in, I stirred the mixture together just until I could smell the garlic then left it to simmer as I gathered my wet ingredients.
I added 3/4 cup of chicken broth, 14 ounces of crushed tomatoes, 1/2 cup of heavy cream to the pot and stirred until it was combined. I added 1 cup of water to my pot because my mixture was too thick to cook the tortellini. I added the water 1/4 cup at a time, until I thought it had enough liquid to cook the tortellini.
***I have since made this recipe a couple of times and I add 1/4 teaspoon of red pepper flakes at this point. It adds a little kick to the recipe without making it too spicy.
I added in 500g of tortellini. I used tortellini from a local bakery, but you could easily use any brand of tortellini. Once the tortellini was in, I turned the heat up to high to bring the pot to a boil. The tortellini will begin to stick to the bottom of the pot, so I recommend stirring often. As soon as the liquid reached a boil, I turned my boiler down to medium heat and let my tortellini cook for 15 minutes.
While the tortellini was cooking on medium heat, I chopped up a handful of fresh basil. Once my tortellini was cooked through, I added my chopped basil to the pot and stirred until it was mixed in, without letting it cook for too long.
Once my basil was incorporated, I turned my burner off and transferred the Italian sausage tortellini into a large casserole dish, grated some mozzarella cheese on top and cooked it at 300°F for 10-15 minutes (just until the cheese is melted).
ITALIAN SAUSAGE TORTELLINI:
Ingredients:
1 tablespoon olive oil
1 onion, diced
6 (600g) Italian Sausage
3 cloves garlic, minced
3/4 cup chicken broth
14 ounce can crushed tomatoes
1/2 heavy cream
1/4 - 1 cup water
500g tortellini
salt and pepper to taste
handful of fresh basil, chopped
Mozzarella (to taste)
Directions:
1. Heat olive oil in a large skillet. Once the oil is hot, add onions. Remove sausages from casings and add to skillet. Use a wooden spoon to break the sausage into small chunks. Cook the sausages on medium heat until they are browned and cooked through.
2. If your skillet is too small, transfer sausage and onion into a pot and reduce burner to low heat. Mince garlic and mix it into the sausage until it is stirred in.
3. While on low heat, stir in chicken broth, crushed tomatoes, heavy cream, water and tortellini. Stir the mixture until it is combined, then increase heat to high and bring to a boil.
4. Once the mixture boils, reduce to medium-low heat and let the tortellini simmer for 15 minutes, or until it is cooked through. As the tortellini is cooking stir in fresh basil.
5. Once the tortellini is cooked through, remove the pot from the heat and pour the Italian sausage tortellini into a large casserole dish. Grate some mozzarella cheese over the top, cover with tinfoil and cook at 300°F for 10 minutes.
Enjoy!
Kenzie
Once the Italian sausages are out of their casing, I put them in the skillet to cook with the onions. As they are beginning to cook, I use a wooden spoon to break the sausages into small pieces (about the same size as the tortellini will be).
Once my garlic was in, I stirred the mixture together just until I could smell the garlic then left it to simmer as I gathered my wet ingredients.
I added 3/4 cup of chicken broth, 14 ounces of crushed tomatoes, 1/2 cup of heavy cream to the pot and stirred until it was combined. I added 1 cup of water to my pot because my mixture was too thick to cook the tortellini. I added the water 1/4 cup at a time, until I thought it had enough liquid to cook the tortellini.
***I have since made this recipe a couple of times and I add 1/4 teaspoon of red pepper flakes at this point. It adds a little kick to the recipe without making it too spicy.
Once my basil was incorporated, I turned my burner off and transferred the Italian sausage tortellini into a large casserole dish, grated some mozzarella cheese on top and cooked it at 300°F for 10-15 minutes (just until the cheese is melted).
ITALIAN SAUSAGE TORTELLINI:
Ingredients:
1 tablespoon olive oil
1 onion, diced
6 (600g) Italian Sausage
3 cloves garlic, minced
3/4 cup chicken broth
14 ounce can crushed tomatoes
1/2 heavy cream
1/4 - 1 cup water
500g tortellini
salt and pepper to taste
handful of fresh basil, chopped
Mozzarella (to taste)
Directions:
1. Heat olive oil in a large skillet. Once the oil is hot, add onions. Remove sausages from casings and add to skillet. Use a wooden spoon to break the sausage into small chunks. Cook the sausages on medium heat until they are browned and cooked through.
2. If your skillet is too small, transfer sausage and onion into a pot and reduce burner to low heat. Mince garlic and mix it into the sausage until it is stirred in.
3. While on low heat, stir in chicken broth, crushed tomatoes, heavy cream, water and tortellini. Stir the mixture until it is combined, then increase heat to high and bring to a boil.
4. Once the mixture boils, reduce to medium-low heat and let the tortellini simmer for 15 minutes, or until it is cooked through. As the tortellini is cooking stir in fresh basil.
5. Once the tortellini is cooked through, remove the pot from the heat and pour the Italian sausage tortellini into a large casserole dish. Grate some mozzarella cheese over the top, cover with tinfoil and cook at 300°F for 10 minutes.
Enjoy!
Kenzie
Subscribe to:
Posts (Atom)


